Wednesday 10 April 2013

WE DID IT!

Today at 10am our final render completed for our animation! We threw it onto my laptop and hurried into the hallway to watch it in secret as a group before presenting it to the class later today. Last night we thought we would leave the lab before midnight but due to some difficulties we came to realize that we would be here all night. Surprisingly the computers cooperated well last night and we could fix a lot of the bugs we had.

The soundtrack for the animation is now complete along with the sound effects. All of the sound effects were done with recording foley sounds and manipulating them in Cubase 5.

The website can now be seen at www.UprootedShort.com. It is newly updated with character, team and about pages. It also links to our various contact/social media pages, these include:

Vimeo: www.vimeo.com/FuzzBuzzStudios
Facebook: www.facebook.com/uprootedFilm
Email: fuzzbuzzStudios@gmail.com

Now... what you have been all waiting for.. our animation!


We hope you enjoyed following us on this journey to completing this project! In the future we are hoping to submit this animation to various animation festivals!

Saturday 6 April 2013

Home Stretch

With only four days left until our short film is to be presented, the finish line is finally in sight. Our new environment proved to be exactly what we needed: our render times have dropped down drastically and now fit within our limits, and the environment itself has come together as a cohesive whole.

With every portion of our animation either rendered or currently rendering, we are taking this opportunity to work with completed renders in After Effects. As mentioned earlier in our process, we could not simply render out a sequence of frames and then place each frame together in a sequence; each frame of our completed animation consists of many "plates" which contain individual partitions of the final frame, separated at render time and then re-assembled in a stage known as "compositing".

To begin compositing our animation, there are many steps that must be taken. Some of these were taken as early as setting up the renders, requiring us to render out depth passes of our plates alongside the actual image. These depth passes use a range of values from 0-255 to indicate the distance between surfaces and the camera. These values are useful for determining whether an object is in front of or behind another object, as well as establishing depth-of-field effects such as lens blur. We used depth maps extensively to aid in the construction of our scenes.

From here, we can begin editing the components themselves, and enhancing the scene overall. Because each component is contained within a plate, we can modify the footage for that component separately from the rest, or we can apply adjustments to the entire scene. Most of our time at this stage is spent adjusting the lighting.

Another step taken at the rendering stage to aid in compositing was the preparation of a fog plate. This is a sequence which captures the output of a volumetric shader applied to our entire environment set to move and behave much like fog would. This plate is used to give the scene more atmospheric colour and give depth to the environment.

From this stage, a few final adjustments are made and the scene is rendered out of After Effects to be used in the final product. Initial compositing work goes fairly slow, as it takes time to find which adjustments need to be made and in what order they should be made, but once we get one scene looking just right, we simply need to apply the same techniques throughout our animation.

Thursday 4 April 2013

A New Turn

If you had read our previous post you may have come across the idea that we were running into a lot of rendering issues. If you hadn't read that post, we were running into a lot of rendering issues. Last night at around 3am as we were setting up renders in the lab, we came to the conclusion that there was no possible way that our project would be done rendering, composited and edited by the Gold Stage (Wednesday, April 10th). The thing that was setting us back so much was the environment. So, we basically deleted all of our environment - less than a week before it was due. There is no more grass, no more leafy trees that sway in the wind, no more Herbil modifiers, and basically no more paint effects. All we had left was the matte, mountains and some random plants and rocks that were modelled. Within 4 hours we recreated our environment with conical pine trees and a grass green plane for a ground. This generated a more cartoony style and thus the matte painting we had previously did not make sense. After doing a quick matte in photoshop of just clouds the new environment was a go! We implemented it into scenes and began rendering at 9am.

We are confident that this approach will improve our project for several aspects. Such as in having a consistent cartooney style and a project size that we can better manage. Although we lost about 3 weeks of environment work, this process is for learning and so we now know not to cover a whole environment in paint effects (then convert them to polygons to be able to render in Mental Ray although they are meant to be rendered in Maya Software).

Over the past few weeks we have learned what not to do with renders... Not sure yet what all the right settings are for rendering but we are getting there! It is now 4pm and we almost have a full scene rendered which beats a week of straight rendering and having one scene close to being fully complete. I think this was a step in the right direction, and we are all feeling very optimistic about these renders :)

Friday 29 March 2013

And Rendering...

Once Alpha was done we pulled an all nighter to get to the rendering phase once again for our final stage! We fixed up our animation and added some more environment elements. As today is a statuary holiday we have spent it in the labs taking up every computer we can to render. Literally every computer we can: we just hit the maximum available Maya licenses for the school. So now we are waiting for the smaller files to stop rendering so that we can begin in new ones right away.

As we don't really know how to render properly we are taking a risk in the way we are doing it. Since our files are way too large and complex to render on their own anymore, we've separated each one into different layers to render individually. For instance, the grass in Scene 1 will not render as a single field, it is broken down into 10 smaller patches. We have looked into different methods to do grass but found that it would be a bigger toll to redo it than to continue on with what we have and hope for the best.

In order to render the different components separately, we couldn't just break them apart. Each of the 10 layers of grass that is rendering needs to also have shadows being cast from all the different environment objects and characters. To do this, every object is present in the scene, but we have set it so that only the ones we need to be shown for the current pass is shown, with the rest being rendered as invisible shadow-casting objects.

To speed up our renders as much as possible, we are skimping a bit on flexibility. When rendering, each frame comes out as a set of "passes", which contain all of the information from a certain aspect of the master render, such as shadows, highlights, or even more complex data like motion vectors and relative-camera depth. The more render passes you produce, the more control you have over the components of your scene, but each render pass added takes up additional time and space per computer. To minimize the time spent rendering, we chose to only render out the passes we think are necessary in each scene, often using only the master and a depth pass to help in compositing them together.

In addition to all of our characters and environment objects, we are also rendering out a layer of coloured fog with each scene. To avoid getting too wrapped up in the details and complexities of volume shaders, particulates, and noise generation, this fog has to be rendered using a completely different renderer (Maya Software as opposed to Mental Ray). To make our fog, we simply created a large cube around the entire environment and attached it to a a Maya volume. After playing around with some settings and colours, we achieved something which gave a fairly realistic distribution. This fog layer will be useful when compositing, because we can use it to give the environment a much greater sense of depth and occlusion.

Wednesday 20 March 2013

Particle Systems

For the Alpha/Previs, I had created a basic particle setup which utilized two emitters, one for dust, and one for dirt particles. This is for the scene where the tree is ripped from the ground. Today, I spent the entire day improving the setup to enhance the look of the scenes and make sure that the tree being ripped out looks like it has force behind it, and will look awesome.

I started off by adding more instances of dirt particles, and creating a new rock/dirt texture for them. I then went in and spent a lot of time tweaking the amount of particles, the area of effect, and colors and transparencies so that everything would act the way we want it to.

Then I moved onto the ground. If a tree is being ripped from the Earth, you would expect the ground to be pulled up with the tree, so I create an additional plane just underneath the ground. I shattered it to create broken pieces, and then animated the pieces to rotate towards the tree and pull upwards out of the ground as the tree lifts.

Through a combination of the two, the scenes have gained a lot of value, showing the strength of Behemoth as he rips out the tree from the ground.

Here is a before and after comparison to get an idea of what was created today.

Before-  a flat shot, showing the roots pulling out

After - dust, debris, ground breaks round out the shot

Monday 18 March 2013

Previs Update

This week we rendered out all of our scenes with basic features, in order to test our timings, errors, glitches and so forth, and to show that all of our features are under way. Now that we have a good idea of all the fixes and changes we need to implement, we are hard at work at doing so. Keep in mind, this video is a work in progress and is an alpha render, so there are many features not included in order to save on render times.


The overall animation is coming together, but we are working on improving render times, getting in all of our main and extra features, cleaning up the animation and timings, and making sure it looks as clean and solid as possible.

A scene render with grass

Sunday 10 March 2013

The Waiting Game

This week we have completed all of the animation for our film. We split up the scenes and all powered through to get it completed, as we have our Alpha due this upcoming week. The alpha will show all of our animation, but an unpolished version. Some environment models will be basic, and we will not include every detail as to save on render times for this week. We are showing that we have been able to get through all the major challenges of our animation and have made it to the final stretch after a lot of hard work. There is still plenty of work to be done, as we are collecting a lot of information on lighting, rendering, and compositing techniques as to speed up our render times and produce the most polished product that we possibly can. As for now, we wait as our Alpha renders out, and are beginning the home run towards our Beta and Gold milestones.

Sunday 3 March 2013

Behemoth Lives

Through plenty of tests, changes, and just flat out fails, Behemoth is alive. This guy went through a lot of trials, and changed a lot along the way. Originally, I had made a basic model in ZBrush and used that during the Prototype in order to do some animation tests. I wasn't sure how I was going to go about creating the model, and there seemed like a few solid options. The first test I tried was to go along the entire basic model and extrude out polygons from it in order to create the armour. It seemed like it would turn out alright, but in the end with the way I had approached it, it really just looked flat out awful and I knew it wasn't going to be something I could be happy with. Then, I had the idea of trying to create the model in ZBrush. I wanted to get more familiar with the program anyway, so it seemed like a strong idea. However, every time I tried to bring the model in to Maya, it was just way lower resolution than I expected, and I just couldn't figure out how to get some weird changes it was experiencing under control. Not to mention that it was porting over in millions of polygons, which was definitely not ideal. Although I was frustrated with the process, I just moved on to my next option.
Behemoth (by Colin Grey)

Concept reference
I began modelling each individual piece of armour in Maya, and then placing it around the base model, making sure to fit each piece so it would fit properly and would not interrupt anything when being moved around and animated. When I was happy with the pieces, I moved onto the textures. After trying plenty of different styles for the armour texture, I found one that I was fairly happy with. It gave the right reflection and looked good. However, it didn't 'wow' me, and I kept trying. I found a basic rust texture on-line, and although it didn't look great, it definitely had a cool feel to it. I edited it heavily, and then figured out how to merge it with the previous texture I had created, in order to get the current texture.


Then I began on the dynamic wires. I wanted to create something that would hang and react to its surroundings as we animated it. At first, we attempted to create the wires using hair (as we had created the tongue for Herbil), however, after playing with it for a while, I was just really not taking a liking to it. It did not take on textures well, and was not easily manipulated to look how I wanted it. I decided to try and change it up in order to match the concept more. I created nCloth wires, and placed them around the body, making sure that as the robot moves in animation that the wires were reacting properly (bouncing off the body and so forth)... and they worked! I edited the old texture I had created for the robot slightly, placed it on the wires, and it managed to work well with the rest of the model.

I finished up the model by manipulating the armour in various places to break up the symmetry and look old and decaying in order to match the textures. The UV maps were smoothed out and made sure they were all functioning properly. I also spent some times trying to create some sparks which would shoot out of the end of the wires, but I decided it was taking longer than we wanted it to, so I scrapped it, and if we get time in Post, we can look at adding it in a different way.


The image above shows some of the rig controls for the robot. His rig makes sure that he will be able to do everything he needs to for our animation, with the ability to move his knees, feet, legs, arms, wrists, fingers, neck, and so on. His rig updated as the model did, and was done with parenting (linking the body parts together instead of weighting certain areas) in order to get the proper blocky robot movement needed.


Wednesday 27 February 2013

Scared Herbil

Due to the variety of motion we included in our storyboard, we knew that it would be nearly impossible to create a single 3D model which allowed us to animate Herbil. Certain aspects of the character such as the detachable arms and flailing tongue were radically different from his original state, and so we planned our first model in a way that would let us modify it halfway through.

Once we had finished the cute model, the first step in creating the scared model was to separate the arms from his body. We then smoothed the resulting holes in the mesh down to small points which could later be attached by tubes. The majority of the work that went into modifying the model went into these arm-tubes. We knew that manually animating the flailing motion of Herbil's arms would be a very tedious and difficult process, and so we used Maya's dynamics system to simulate the motion for us. In order to achieve the effect we wanted, we used Maya's nHair system to create dynamic curves and attached cylinders to the control points on each curve. This made the cylinders twist and deform according to the curve, making the animation that much simpler for us!


A similar method was used to create the tongue, although in this case, the tongue is actually just a single hair sticking out of the center of Herbil's mouth. It's a bit strange when you think about it, but the simplest solutions are often the best.


As a result, we now have a completed cute Herbil model, as well as a completed scared Herbil model!


Herbil Update

It's been awhile since we've revealed our progress on Herbil, but rest assured, he's been receiving a steady stream of updates while we've been explaining the butterfly and environment process. As we get closer and closer to our Alpha milestone (March 15th), the final product of our animation should start to take shape, and we hope to reveal that shape through the next few updates.

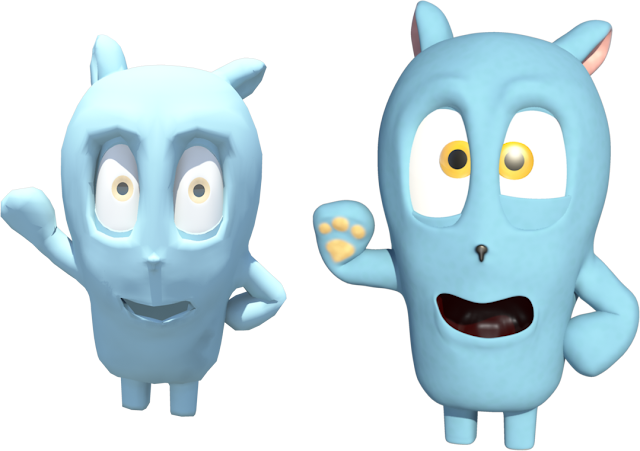
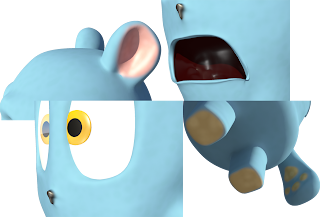
Left: Prototype Herbil
Right: Alpha Herbil
The first and most noticeable of Herbil's updates is that his character model is now complete. After applying some finishing touches, sculpting an interior to his mouth, and re-modeling his eyes, we increased the divisions on his mesh to make it smooth and give us as much control as possible.

Once we had reached this step, we created Herbil's control rig. The basics of this rig were essentially the same as rigs made previously throughout the project, however, the cute character is our most expressive character, and thus has the most complex control rig. Although the skeletal controls for the character have remained the same, we now needed to give ourselves a method of controlling the facial expressions of the character, as well as re-think our method of controlling the eyes in a way which no longer exploited the simplicity of earlier models. The GUI we created to animate these facial movements is by far the most in-depth set of controllers we have attempted.

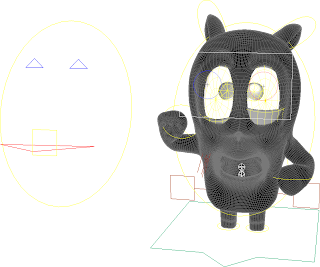
Herbil's Control Rig
It may not look like much, but this GUI gives us all the functionality we need, and masks hours upon hours of work. A few of the controls seem fairly intuitive, whereas others are more complex than they look.
  • The four thin rectangles control the individual eyelids, and function by rotating deformed spheres around the eyeballs.
  • The rectangle and circles in front of Herbil's face control the direction of his vision, and function by manipulating the geometry of the eye such that a small disc composing the pupil and iris is rotated and translated about the surface normal of the eyeball without detaching from the eye or rotating the eyes as a whole.
  • The two triangles at the top control the eyebrows, and function through a slightly more complex animation technique named "blendshapes", which will be explained in more detail below. The eyebrow controls allow us to raise and lower Herbil's brows, as well as deform them to give the brow an angled look. 
  • The perpendicular square and triangle control Herbil's mouth. The triangle simply controls the orientation of the jawbone in the skeleton, and the square controls a variety of blendshapes.
The majority of these controls were created by linking the relative position of GUI elements to the various attributes of Herbil's mesh and blend nodes through mathematical expressions.
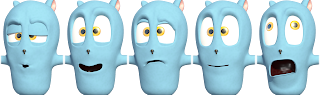
Facial Expressions
This GUI would be practically useless, however, without the use of blendshapes. To add blendshapes nodes to our model, we simply duplicate our original mesh, mold it into the shape we want, and create a deformer between the two. This creates a simple slider control which can be used to alter the percentage of deformation. By linking this control to a GUI element, we can easily pose our model at any interpolated position between our original shape and our blendshape.

The concept behind creating blendshapes is actually pretty simple, but in order for them to be used effectively, many different shapes are needed, with careful attention being paid to the sculpting process of each.
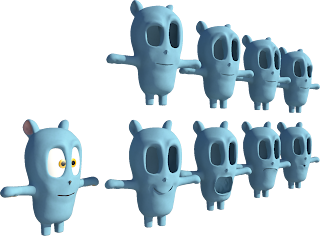
Blendshapes
As you can probably tell from the above images, we have also begun applying materials and textures to the different areas of Herbil's body. His skin is covered in a soft leathery material to give it the look of cartoon animal hide, and his paws and ears have been given different colours. The inside of his mouth is given a wet, organic look by using Maya's ocean material. His eyes are given shiny, reflective materials in order to make them appear expressive. The reflections on his eyes were particularly complex, as simply increasing their reflectivity makes the entire eye act like a mirror. In order to avoid this, we researched different techniques for creating realistic eye reflections, and discovered that many 3D software materials include a shader for "Fresnel falloff", which causes light rays to reflect based on the difference between the angle of the surface and the angle of the camera. Unfortunately, we could not find a pre-built Fresnel falloff solution in Maya, and so we had to create our own and link it to the reflectivity of Herbil's eyes.

Material Close-Ups
You may have noticed that, at this point, Herbil is completely bald. The original concept for Herbil described him as being covered in soft blue fur, but through the process of developing the character, we decided against fur in the final design. In addition to aesthetic reasons (we quite like the new bald Herbil), there were many technical difficulties that came with using fur. After spending many hours attempting different techniques and technologies for achieving the intended fur effect, it was determined that each of the possible solutions resulted in one or more major drawbacks. Although we ended up losing time in our efforts to create fur, any further time that would have been wasted trying to fix a fundamentally flawed implementation can now be used on other aspects of the film.

And so, after all our hard work, the cute Herbil is finally ready for animation!
Shmeeh!

Saturday 23 February 2013

Further Environment Planning

When we started working on the project, we all had a general idea what the environment looked like: we wanted it to be a mystical forest; a place for Herbil to live. However, we never discussed exact details such as tree aesthetics. Are they normal maple or oak trees or are they Wonderland-style curvy mushrooms? In doing some tests and looking at references, we knew that the most important part of making a forest look mystical was by playing with the lighting. As well, it's not always the look of the trees, but the forest ground that gives it a mystical ambiance. Unfortunately for our project, we do not have time to play with the environment too much. Thus, the land is going to be comprised of mainly grass and some flowers in distinct locations.

Below is a quickly drawn out map of where the characters are going to move within the sample environment. We had to plan out the landscape and decide where hills, tree clearings, characters, and the sun will be placed. The sun is located on the bottom left of this bird's-eye-view, and the robot will have his back to the sun for the intimidation shots. This way the light will not light up his face until the end scene when the tree crashes. The main clearing in the forest is a flatter area because we want Herbil and the robot to be on an even plane to show a proper comparison between Herbil and Behemoth's size.When Herbil feels scared by the tree the land will be uneven to parallel how he is feeling.


We have named our main tree that gets thrown the 'mystical tree' for simple reference (on the map it is the purple circle). This tree will be placed on a hill with flowers near the base. To create this tree we took a paint effects tree without its leaves and played with the settings to get the base shape of a trunk, branches and twigs. To add on the long strands we painted blond curly hair onto the object's tips, then created a preset to be applied to each strand. This preset converted each strand of short curly blond hair to a long straight strand. A material was then applied to all of the strands to give them a uniform colour pattern. To make each strand move when the tree gets thrown, we added spring dynamics to the paint effect we used.
Tree with default paint effects brush on tips mixed with sample strands.


Completed Mystic Tree Sample 1

Wednesday 20 February 2013

Mid Sprint Update

We are now well into the production phase of our project. We have three models completed or nearly completed (scared Herbil, normal Herbil and the butterfly) and a fourth on its way (Behemoth). Currently I am working on creating the environment for where the story will take place. We really want mystical trees and have the idea of a fairy tale world to where this story takes place and trying to make the environment match the idea is really fun! I am finding that using the Maya paint tools are both useful and entertaining. There are so many options. For instance, we can create a field of hands within seconds. Once you have a field of hands you can change the materials/textures of all of them or individual ones. Thus you can have a field of polka-dotted purple and yellow hands within a few minutes (depending if Maya crashes or not ;D ).

As we continue to encounter difficulties with our project, we are attempting to adapt to each situation as they arise. Right now Sean is working on re-painting the weights on scared Herbil because the way we decided on doing the arms involved editing the mesh of Herbil, and Colin is currently working on the robot.

Monday 18 February 2013

Butterfly Wings

Yesterday we continued work on finalizing our character models, but we also found time to illustrate a detailed texture for the butterfly wings. As can be seen in the video below, the wings now have areas of transparency, which was accomplished by modifying the alpha mask on the original texture to give it softer edges and a duller interior.


Saturday 16 February 2013

Butterfly Update

Once Tegan had finished modeling the body of the butterfly, we could move on to the next step in preparing the character for animation: rigging. Like our cute character, the butterfly character's rigging process involves weight-painted skeletal controls, as well as custom GUI controls. In this case, luckily, the control rig was much simpler in concept and proved to be easier to create.

In terms of skeletal controls, all that needed to be done for the butterfly was create bones for each of the legs, and then spend about an hour painting the weights for those bones. We determined early on with our prototype butterfly that the majority of the insect's motion would not be skeleton-based, and we would save time in animation later on by coming up with alternatives.

To give the butterfly the ability to bend its body, we chose to use a non-linear bend deformer. This gave us a natural range of motion, as well as allowed the entire body bend to be controlled with one element. The butterfly's antennae were given the same treatment. The wings of the butterfly were more complex, and required multiple varieties of deformers in order to achieve the flapping motion we wanted, but as we had solved this problem with our earlier model, we simply needed to reproduce the functionality we had created for our prototype butterfly.


In addition to rigging, completing the butterfly model gave us the chance to develop some basic materials for the character. For now, the butterfly wings have been given a limited texture to inform their shape, and we have experimented with different bump-mapping techniques in order to give the flat wings the impression of depth as they move through the air. We have also applied some basic materials to the butterfly's body and eyes to give it a more iridescent look.

Early Butterfly Material Tests
 Although the butterfly has a limited amount of screen-time planned for our short film, the character's involvement is just as important as Herbil or Behemoth, and with the completion of its control rig, we now have our first character fully prepared for animation!


Thursday 14 February 2013

Butterfly Body Modeling

As you previously saw we have figured out a way of how to rig the butterfly in a way that made sense to the wings moving. Now we just needed to actually make a butterfly to fit that render to. Over the last couple of days we have been working on a body of the butterfly. Using reference images from Google images proved useful as we have never seen a butterfly in macro view before.

Butterflies are a lot more 'buggy' then you may perceive. They have six legs long bendy legs, with 3 different parts to their body and massive eyes that encompass most of their head area. Their legs all come out of one area, which you would think be very unbalancing but they stay standing. Neat fact, butterflies taste with their feet!


Wednesday 13 February 2013

[model] Paint FX Tree

Maya tree FX model (Colin)
Using the Maya paint FX tool, we are able to create some fairly good looking trees. It needs tweaking on the amount of branch divisions it goes through, but since the environment is a 'mystical/magic' forest, having trees that have a non-standard look to them will work well for us. I added a glow to the tree and am currently testing the use of wind animation on the leaves. Paint FX turbulence seems to be the best choice for this, so I'm exploring it and going to see if we can get the results we desire.

Sunday 10 February 2013

Prototype Update

On Friday our Prototype was due. At this stage in the project we must be able to display to the client that we have the skills necessary to produce a 3D animation within the time span. To show this we completed several different tasks and placed them all into one final video to present to the client.
We showed that we can create:
  • Models (making all the models you see from scratch)
  • Animations (several different short animations and run/walk loops)
  • Dynamics (noodle arms of Herbil when he is scared)
  • MEL scripts (to generate the environment)
  • Particles (forest spores)
  • Materials (to show that we have a basic understand of materials and how they are applied)
Below is the video we submitted as our prototype. Enjoy!


Butterfly Prototype

Originally, we were pessimistic about the amount of work required to create the butterfly character for our animation. The wings in particular would be incredibly detailed, and with the appearance of the wings being important, the texturing, materials, and UV mapping would be very complex. The wing animation was also considered to be a problem, as we could not simply rotate the wings and attaching the mesh to a skeleton through weight-painting would be tedious and difficult. Luckily, we managed to come up with solutions for both of these problems within a few hours of work, and an early butterfly model was made this morning as practice for the final.


In order to avoid modeling detailed butterfly wings, we simply created a planar surface and applied a texture with an alpha mask to the material. This prevented any UV mapping work on the wings, as the texture can be applied to a uniform set of polygons, and the alpha mask gave the plane the appearance of being shaped to match the wing texture.

To animate the wings, we applied a set of twist and bend deformers to the planar surface and created a custom GUI. By creating a relationship between the relative position of a GUI element and the various attributes of the deformers, we developed a simple interface which allows us to control the flapping of the wings. The deformers save us an enormous amount of time in rigging effort, and the GUI will save us time in animating the final butterfly.

Prototype Butterfly Control Rig

Saturday 9 February 2013

First walking animation [robot]


This is the base model of the robot I've used for testing. I had some challenges with the rigging portion and figuring out how to make him move like ... well ... a robot. A lot of the set-ups in testing were causing him to have deformations, but by changing the weighting and parenting the separate pieces on to the joints, he is working pretty well! This is a loop of a test walking animation for the robot. There were rigging tests I did, such as putting a foot roll on the model (like a human would have), but because of the structure of him, it doesn't make a whole lot of sense. The whole idea is that he is big, bulky, metal, and is going to walk slow and heavy.

Friday 8 February 2013

Pre-Prototype Update #1

Recently we put our first model to the test! Sean added a basic rig to Herbil and then we went to practicing animation. We had a lot of fun when it came to this, making Herbil move in funny poses and added silly materials onto him. It was a great way to explore the different animation elements of Maya without the pressure of making it completely perfect for our final product. The only difference between the final model and the one you see below is that the final will have an interior to go with the mouth, more detailed features, and added textures.

I have nearly finished Herbil's model, just perfecting the inside of his mouth and tongue. As well, I have played around with quick fur textures and a very simple jump animation. Sean played around with different material settings and attempted a looping run animation which we hope to have polished and ready to present as part of our prototype later today.


Wednesday 6 February 2013

Super Awesome Flowlines #1

When it came time to model Herbil's mouth we realized that the model had not been set up for proper flow lines. Flow lines are the curves of the mesh which map to the flow of distortion due to animation.When modeling a mouth it is important to have proper flow so that the shape of the model is correct. as well as  to prevent strange motions when animating the facial expressions. On a face, flow lines have to go around important features such as the mouth and eyes. Before shaping the mesh to fit to this method, the body of Herbil was very boxy and inorganic. When viewing the picture below, pay close attention to the lines around his mouth, arms and eyes.

This was the first model that I have worked on and the first time implementing flow lines into a model. I used reference images found online to understand the shapes around the mouth crease and where the flow lines come from (such as the lines going from the nose around his chin). The next step is to model the interior of his mouth and then rig 'em good!

Tuesday 5 February 2013

Post-Pitch Update

Hello!
Sorry for the inconsistent updates; we have been busy with school work.

The pitch to the class was last Friday (Feb. 2, 2013) and it went well! The goal of the pitch is to sell your idea to the class. Proving to them that this is an innovative project and everyone in the group is a suitable member who can offer something unique to the project.We set up a slide show to display our poster and played the animatic to the 'clients' (the class and professor). Originally, instead of an animatic, we were just going to display our storyboard and click through each image. We created a full animatic for the presentation because they are more visually appealing and have a better sense of timing versus a storyboard. The animatic was very well accepted among our peers; they especially enjoyed the cheesy sound effects that we created from recording Colin Grey's voice and manipulating them slightly. Below is the animatic that we made up for that presentation.

Currently Sean and myself (Tegan Scott) are building the 3D-model for Herbil and working on environment objects (such as trees). Colin is modeling Behemoth, the giant robot and doing particle tests for grass and flying forest spores.


Thursday 31 January 2013

Calendar (Updated)

With the pitch presentation drawing near, we felt now would be a good time to break down our milestones for the next few months into a more detailed list of tasks. The dates chosen are rough estimates of course, but the plan of action is solid.

Calendar as of Jan 31

Project update

This past weekend our team participated in Global Game Jam, so we had a few days break to just work on a game, which turned out pretty successful. We are currently working on finishing the modelling and rigging of our characters, so that we can start our animation work in the next week or so. On top of that we are working on all of the documentation for the project, including our Pitch presentation which we have to present to the class tomorrow. The prototype and design document is due in the next couple of weeks and we have made good progress on both of those so we will be able to get those out of the way and get right down to the core work. I (Colin) am planning out any VFX for our animation and this week I will be working to get some of the shots up and running.

Thursday 24 January 2013

Movie Poster [variation]

Movie Poster for 'UPROOTED' (by Colin Grey)
When it comes to design, simple is good. With these poster ads for our short, we can definitely create multiple variations for it. We want to work on some 'marketing' design work so that once we create our official website for the project, we can have a good basis to work from. Also, these posters will give me a creative way to show off all the cool materials we are working on! As you can see, our cute fuzz-ball character here will have a generous coating of soft blue fur.

ZBrush Robot [general form]

Robot Character Model - First Form in ZBrush (by Colin Grey)

I've gone into ZBrush and modelled out the form of our robot character based on the concept art I produced. The basic shape and structure is all there, so I will now bring it into Maya so that I can start laying out some of the armor and further build out his shape. I will most likely jump back into ZBrush at some point to model out a few of the more detailed pieces of armor such as the chest-plate, but for now I will be building on the main structure and working on materials for this big guy.

Wednesday 23 January 2013

Maya Practice #2

Today my goal was to begin modeling, and to learn the basics of Maya. The model is based on the references done previously of Herbil (the blue creature). Below is the first model I have ever created, it is still in progress as there is no face or ears but it is a start :) While modeling I found it challenging to determine if I should model limbs as separate pieces or extrude them from the model. I modeled the arm multiple times as a separate model but it was not looking the way I wanted it to. I took the advice from a more experienced modeler and extruded four faces from its side to form the shape below.
By: Tegan Scott

Storyboard

Today we finalized the storyboard for our animation, but you don't want to spoil the surprise, do you?

Spoiler warning!

Tuesday 22 January 2013

Progress Update

Tonight, we worked hard on the storyboard and got it pretty close to completion. The story has turned out great, and we figured out a lot of great story/shot set-up during the storyboarding process. We're feeling really good about the progress we are making with the short thus far. We have all of our concept done, and have started tests with models/rigs and materials, such as fur tests for our fuzzy little guy. The next week and a bit will be dedicated to the modelling of our characters, rigging of both of them, and to make some progress or have completed our materials. While we are doing this, we are also figuring out some major requirements such as how to populate our forest environment properly and with various models. I (Colin) have also been working on particles for a few of the shots, including falling dirt/dust and whimsical forest fairy   particles. Our design document will start to take shape this week as well and we will sort out everything we need to do straight through until April. We have a whole lot to do, but we are working really hard and are really excited to keep pulling late nights in the lab and making this all come together.

Robot Concept Design

Below are some silly concept designs for the large robot. We had created these after 10 hours of drawing in the lab.


By: Tegan Scott
By: Sean S. LeBlanc

Monday 21 January 2013

Maya Practice #1

In preparation for the hard work ahead, the team decided to take the weekend to individually work through various online tutorials to hone our skills. It's very unlikely that any of the assets worked on will be used; the goal of the sessions was practice, not productivity.

Tree Concept (produced by Sean S. LeBlanc)
My personal objective for the first practice session was to create a model resembling this hastily drawn tree concept. Of course, before any real work could be done, the basics had to be covered. Maya's interface can be quite daunting, but after a couple of hours of walking through the various tools and concepts, I felt ready to start modelling.

Rather than follow any predefined workflows for this model, I decided that it would be a good idea to try and develop an intuition for this sort of thing, and improvised the process as much as possible, only relying on tutorials when I stumbled upon mechanical issues. Some fairly large errors were made, and the end result wasn't quite as complete or polished as I would have liked, but I learned a lot from the process. Subsequent attempts are expected to go more smoothly (and involve a bit more forethought).
Failed Tree Model (produced by Sean S. LeBlanc)

Friday 18 January 2013

Calendar

This is our basic schedule based on initial discussions.
We will flesh it out more and make changes as we go through the process.

Calendar

Concept - Character #2

Creature Concept
Concept: Herbil (produced by Sean S. LeBlanc)
Here's the concept for the second character.
Once we had decided that this was our thing, it moved on to the reference stage.

From here, Tegan and myself developed reference drawings of the creature from different angles in a couple poses. These designs give us all a solid image on how our character's body and motion translates into 3 dimensions, and will be used in later stages to help with the modeling and animation of the character.

Creature Concept Rotations
Rotations: Herbil (produced by Tegan Scott and Sean S. LeBlanc)

It also lets us make silly gifs.

Creature Concept (Spinning)Creature Concept (Scared, Spinning)

Concept Designs

The images below are some of the concept designs for the "cute character."

By: Sean S. LeBlanc
By: Sean S. LeBlanc
By: Tegan Scott


Wednesday 16 January 2013

Concept - Character #1

Initial character concept: Behemoth robot (produced by Colin Grey)
This is our first concepts of character #1. The overall feel of the character is achieved to our liking, so the next process for this character is to flesh out 360 shots in preparation for modelling.

DS1 Animation - Project Summary

Design Studio is a course which entails taking on a team project for an entire semester, implementing tasks and goals and completing it to the best of your ability. Our teams project consists of a full 3D animation short. The three members of the team include Colin Grey, Sean LeBlanc, and Tegan Scott. We will be using Maya to produce our animation, and After Effects for compositing.

The scope of the project entails..
Main objectives:
-Concept art for two characters
-Storyboard
-Character Models
-Character Materials/Texturing
-Character Rigging
-Character Animation
-Basic Environment
-Shot set-up, compositing
Additional objectives:
-Modelling Detailed Environment
-Modelling Props
-Visual Effects
-Additional shots

As we progress through the next four months, this blog will be used to update our team development progress, from the concepts straight through to the finished product. Any success or challenges the team faces will be posted, along with any progress or testing. The goal of the blog is to keep the team on track and to have a fully documented process to view the extent of learning, commitment, and achieved success through the term.